


Introducing ultra portable live production with advanced broadcast features
ATEM SDI is a family of live production switchers designed for broadcasters who need extreme portability! ATEM SDI switchers are very similar to ATEM Mini, however the video connections are 3G-SDI and each model has double the number of video outputs! You get 4 SDI inputs on the ATEM SDI and ATEM SDI Pro ISO models and 8 SDI inputs on the ATEM SDI Extreme ISO model. Plus all SDI inputs feature standards converters and re-sync! You even get DVEs for…
- ATEM SDI Pro ISO
- External 12V DC power supply with international socket adapters
About The Blackmagic ATEM SDI Pro ISO
This model includes the features of ATEM SDI plus it adds built in streaming and recording to 5 video streams in real time! That’s a clean feed of all inputs for multi‑cam editing! A DaVinci Resolve project is saved so you can open your live production to edit, remix audio and add colour correction!
Introducing ultra portable live production with advanced broadcast features
ATEM SDI is a family of live production switchers designed for broadcasters who need extreme portability! ATEM SDI switchers are very similar to ATEM Mini, however the video connections are 3G-SDI and each model has double the number of video outputs! You get 4 SDI inputs on the ATEM SDI and ATEM SDI Pro ISO models and 8 SDI inputs on the ATEM SDI Extreme ISO model. Plus all SDI inputs feature standards converters and re-sync! You even get DVEs for picture in picture effects! The USB works as a webcam for connecting video to computers, while the Pro and Extreme models feature built in streaming. For audio the Fairlight mixer includes a compressor, limiter and 6 band parametric EQ on each input!
A New Generation of Ultra Portable Live Production!
ATEM SDI gives you the portable design of ATEM Mini, but its SDI connections means you can connect advanced broadcast quality cameras and recorders. This opens up a whole new world of ultra portable live production. The incredibly portable design means you can fit a whole broadcast quality live production system in a small bag or even a backpack! You can use multiple cameras on location and live stream direct to YouTube, or create a broadcast quality link back to a studio with ATEM Streaming Bridge. Unlike single camera remote shoots, ATEM SDI lets you connect multiple cameras so you can create interesting remote interviews with multiple camera angles.
Self Contained Broadcast Quality Switcher
ATEM SDI’s compact all in one design includes both a control panel as well as connections. The front panel includes easy to use buttons for selecting sources, video effects and transitions. The source buttons are large so it’s possible to use it by feel, letting the presenter do the switching! You even get buttons for audio mixing! The ATEM SDI Pro and Extreme models have buttons for recording and streaming control, as well as output selection buttons that let you change the video output between program, direct camera feeds and the multiview. On the rear panel there are SDI connections for cameras, extra microphone inputs, USB for webcam plus multiple SDI “aux” outputs for program video.
ATEM SDI Pro ISO
This model includes the features of ATEM SDI plus it adds built in streaming and recording to 5 video streams in real time! That’s a clean feed of all inputs for multi‑cam editing! A DaVinci Resolve project is saved so you can open your live production to edit, remix audio and add colour correction!
Easy to Use and Fast to Learn!
There’s never been a switcher that’s easier to use, as you simply press any of the input buttons labelled by number on the front panel to cut between video sources. You can choose between cut or effects transitions by selecting the cut or auto buttons. Unlike cut, the auto button tells ATEM SDI to use a video effect when switching inputs. You can select from exciting transitions such as dissolve, or more dramatic effects such as dip to colour, DVE squeeze and DVE push. Add a DVE effect for picture in picture effects with customized picture positions and background. There are even “media players” which are a still store for titles and graphics that you can load via external software control.
Connect up to 8 Broadcast Cameras
With 4 or 8 video inputs, depending on the model, ATEM SDI lets you connect multiple cameras for different views of the performance. Video cameras with SDI outputs such as Blackmagic Studio Camera or Blackmagic URSA Broadcast G2 are much better quality as they have better low light performance and they use professional lenses. All video sources will re-sync to the switcher, even if they operate at different video standards. Everything just works so setup on location is easy and you don’t have to worry about technical problems. Imagine taking advantage of the creative freedom of multi camera live production for interviews, advertorials, theater production, music performances, sports and more!
Outputs Webcam for Video Software!
To ensure maximum compatibility, all ATEM SDI models feature USB that operates as a simple webcam source. That means you can plug into a computer and get working with any video software! The software is tricked into thinking the ATEM SDI is a common webcam, but it’s really a live production switcher. That guarantees full compatibility with any video software and in full resolution 1080HD quality. Choose any software you like, such as Zoom, Microsoft Teams or Skype for a new way to do presentations with a professional multi camera broadcast quality style! The ATEM SDI webcam output also works with streaming software such as Open Broadcaster, XSplit Broadcaster and more!
Live Stream via Ethernet on ATEM SDI Pro
ATEM SDI Pro and ATEM SDI Extreme models have a built in hardware streaming engine for live streaming via their ethernet connections. That means you can live stream to YouTube, Facebook and Twitch in better quality, without dropped frames and with simpler settings. Just select the streaming service and enter the streaming key! There are palettes in ATEM Software Control for streaming setup, plus streaming status is also displayed in the multiview. Streaming status is easy to understand as the data rate indicator shows internet speed required for the video format you’re using. If you’re technically minded, you can update the streaming profiles in an XML settings file to load new services.
Connect 5G or 4G Phones for Mobile Data
If you’re doing live production on location then the ATEM SDI Pro and Extreme models support connecting an Apple or Android phone to the USB port to use mobile data! It’s also a great backup for the main Ethernet connection. Phone tethering works with the latest high speed 5G phones plus the more common 4G phones! The ATEM switcher will automatically detect when a phone is connected and switch its internet connection to use it, eliminating the need for changing settings. When connected, the phone will power from the USB port so it remains charged from the switcher. By using phone tethering for mobile data, ATEM SDI Pro and ATEM SDI Extreme become the perfect mobile production solutions!
Record Direct to USB Flash Disks with ATEM SDI Pro
The ATEM SDI Pro and Extreme models also support direct recording of your streaming data to USB flash disks! That means you get very long recordings in the same H.264 video files with AAC audio that you streamed, so you can direct upload to any online video site, such as YouTube or Vimeo. Recording to multiple disks is also supported via a USB hub so when a disk fills, recording can continue to a second disk so you get non-stop recording. Record settings and disk selection are set up in ATEM Software Control and you can also display the recording status in the multiview.
Edit Live Production with Separate ISO Recordings!
The ATEM SDI Pro ISO and Extreme ISO models allow you to edit your live event as they can record multiple video streams, including clean feeds of all inputs and program, all at the same time! Media pool images used are also saved with the video files. The video files include metadata tags such as synced timecode and camera numbers. Imagine re-editing your show with new colour grades, effects and graphics! Even the audio sources are all recorded so you can professionally remix your audio!
Edit Live Production in DaVinci Resolve
The ISO models also save a DaVinci Resolve project file, so with a single click you can open your live production as a video edit. All cuts, dissolves and media pool graphics will be loaded. This means you can fine tune edit points or even completely replace shots! The DaVinci Resolve Sync Bin lets you edit shots via a multiview interface, so it’s easy to use and fast! All ISO files will be automatically aligned by timecode, so you can scroll along and see all camera angles perfectly synced.
Add Exciting Video Effects
One of the benefits of ATEM SDI is the professional production values that are possible using the range of built in video effects! The cut button ensures an instant cut when switching between sources. The auto button is a professional term that’s used on large broadcast switchers to enable video effect transitions. There are duration buttons for video effects allowing 0.5, 1, 1.5 and 2 second settings. You can also select the type of effect you want including mix, which does a smooth transition between sources, and dip which fades via a colour during the transition. Or use fun DVE effects that move the image off screen when transitioning between sources!
Work with Professional Microphones
With two independent 3.5mm stereo audio inputs, you can connect desktop and lapel microphones. You can even connect a music player to generate introduction music after the live stream commences but before the program starts. With 2 extra stereo audio inputs, you can ensure a host and guest both have lapel microphones when doing interviews. All audio inputs to ATEM SDI include buttons on the panel for adjusting audio level and enabling inputs into the audio mixer. Plus all models feature a Fairlight audio mixer with all SDI inputs and both microphone inputs connected to the audio mixer allowing live mixing from all your audio sources. The ATEM SDI Extreme also adds a headphone output.
Automatically Converts Any SDI Input Format
Each 3G-SDI video input features its own dedicated standards converter. That means ATEM SDI will automatically convert 1080p, 1080i and 720p sources to the switcher video standard! By default the switcher will set its video format automatically, however you can also set the switcher to any video standard manually! The SDI outputs are a true “aux” outputs so you can independently customize the source video routed to each SDI output. All outputs can be connected to cameras as they include camera control and tally information. On the more powerful ATEM SDI Pro and ATEM SDI Extreme models, the SDI output can also be selected to display the built in multiview.
Secret Broadcast Features Built In!
While ATEM SDI is easy to use, it also has very powerful high end broadcast features! ATEM SDI is even perfect for training new live production crews as it has the same features as the massive switchers used in large broadcast studios. You get an ATEM Advanced Chroma Key, Fairlight audio mixer, DVE, still store for graphics and much more! Simply run the free ATEM Software Control app on Mac or Windows while connected via USB or Ethernet to access the extended features of the ATEM SDI. With a little experimentation you can learn how to produce broadcast quality live production. Only ATEM SDI is a true broadcast switcher hidden in a tiny and affordable design!
Includes Free ATEM Software Control Panel
The ATEM Software Control app unlocks the hidden power of ATEM SDI and allows access to every feature in the switcher. ATEM Software Control features a visual switcher user interface with parameter palettes for making quick adjustments. Although you can normally connect via USB, if you connect using Ethernet it’s possible for multiple users to connect to ATEM SDI using separate copies of ATEM Software Control on different computers! The software lets you access full audio mixing with effects, load still frames and even do advanced macro programming! You can even save the switcher state as an XML file! If you need clip playback, you can even control HyperDeck disk recorders via Ethernet.
DVE for Picture in Picture, Transitions and Effects
One of the most exciting features on ATEM SDI is the built in DVE that allows picture in picture effects and DVE transitions! The DVE lets you create professional picture in picture effects with customizable 3D borders, shadows and lighting. The image quality is the same as high end ATEM switcher models and the DVE supports position, resize and scale, all in real time. The DVE can also be used to create amazing transitions with 16 different DVE squeeze and DVE push effects for adding excitement to your programming. The DVE features a “fly key” so you can use it with custom graphics to create graphic wipe transitions!
Professional Broadcast Transitions!
ATEM SDI includes a wide range of broadcast quality HD native transitions such as mix, dip, wipe and more. All transitions can be customized by adjusting parameters such as duration, border colour, border width, position and direction. You can also use the DVE in transitions, allowing a graphic to be moved over the wipe edge which is called a graphic wipe, and is commonly used in sports programming. To eliminate errors, ATEM SDI has a preview transition feature so you can check your transitions before putting them to air.
Built-in Graphics with Photoshop Plug‑In
The built in “media pool” allows the loading of up to 20 separate broadcast quality RGBA graphics for titles, opening plates and logos. The media player is used to output the selected image so it appears as an extra internal video source for use in graphics and titles. You can even use still frames for complex effects such as graphic wipes. ATEM SDI can also grab stills from video and save them to the internal media pool. Graphics can be loaded via ATEM Software Control or downloaded directly from Photoshop using the ATEM Photoshop plug-in. The Photoshop Plug-in is perfect for graphics that change often, such as scoreboards, as you can download directly into the media player.
Includes New ATEM Advanced Chroma Key
For news or on-set presentation work, ATEM SDI is perfect as it features the powerful ATEM Advanced Chroma Key for green screen keying effects. The chroma keyer is incredibly powerful and features a colour picker to sample background colours for automatic generation of the key parameters. You get precise controls for edge and flare, and there is even a foreground colour corrector so you can match the foreground and background layers for seamless compositions. You can even use it for title overlays by creating graphics with a green or blue background. Plus the ATEM SDI Extreme includes a massive 4 separate ATEM Advanced Chroma Keyers, for a keyer per camera, allowing virtual set production!
Create Amazing Virtual Sets
The ATEM SDI Extreme models include 4 upstream chroma keyers and this allows you to build exciting virtual sets! With 4 independent chroma keyers, you get a keyer per camera so you can build a virtual set for up to 4 cameras. With ATEM SDI Extreme you have 8 inputs, 4 to use for cameras and the other 4 can be connected to a virtual set computer for the rendered backgrounds. Or if you don’t need to move your cameras, you can do fixed camera virtual sets by loading pre rendered still image backgrounds from the media players and media pool. You can setup macros to change cameras and load the correct background into the media players!
Powerful SuperSource Processing!
In addition to 2 independent DVEs in the ATEM SDI Extreme models, there’s also a powerful SuperSource multi layer processor with 4 extra DVE layers plus a background layer, that all appear to ATEM SDI Extreme as an additional input source. Any ATEM SDI Extreme video input can be used for each SuperSource DVE, then it’s all layered together over a media pool custom background. SuperSource is perfect for doing multiple picture in picture displays with people being interviewed because you can set up the effect before putting it to air, still keeping both main DVEs free for other tasks. SuperSource is just like having an extra multi-layer VFX switcher built in!
True Broadcast Style Mix Effects Switching
Although ATEM SDI works in “cut bus” mode when first purchased, it can also be changed to “program/preview” style operation, which is the way broadcasters normally use live production switchers. Cut bus switching is easy and selecting any input will instantly switch to that source. However if you want to operate ATEM SDI like a true professional then you can change the switcher to program/preview using ATEM Software Control settings. Mix effects operation allows a source to be selected but it won’t be put on air until you press the cut or auto buttons. That 2 step program/preview process means fewer mistakes.
Monitor Sources and Status with ATEM SDI Pro Multiview!
When doing larger live productions with multiple cameras, it’s very useful to see all your video sources at the same time on a single monitor. The ATEM SDI Pro and ATEM SDI Extreme models include a professional multiview that lets you see all video inputs, preview and program on a single SDI monitor! Simply select M/V button on the front panel to select the multiview! Each camera view includes tally indicators so you know when each source is on-air, and each view also has custom labels and audio meters. Plus the ATEM SDI Extreme models allow you to select up to 16 custom views! Multiview even includes status for recording, streaming and the audio mixer!
Built In Audio Mixer with 6 Band EQ, Compressor and Limiter
With a built in Fairlight audio mixer, ATEM SDI makes it possible to do complex live sound mixing. The internal mixer features enough channels for each SDI input so you can mix audio from all sources! That’s audio from all SDI sources, plus the 2 stereo mic inputs. Each input channel features the highest quality 6 band parametric EQ and compressor, limiter, expander and noise gate as well as full panning. You can even set up the software to auto mix between inputs as you switch “AFV” or to live mix multiple sources together all at once. All this audio power can be controlled via ATEM Software Control, or you can add a Mackie compatible panel.
Create Broadcast Links with ATEM Streaming Bridge
The ATEM Streaming Bridge is a video converter that lets you receive a H.264 stream from any ATEM SDI Pro or ATEM SDI Extreme and convert it back to video. This means you can send video to remote locations around your local Ethernet network, or via the internet globally! That’s possible because it uses an advanced H.264 codec for high quality at very low data rates. This means you can create broadcast quality links back to your studio using the internet, so it’s much lower cost. To make setup is easy, the ATEM software utility can create a setup files that you can email to the remote studio. ATEM Streaming Bridge is the perfect way to use ATEM SDI as a remote broadcast studio!
Develop Custom Remote Control Solutions
The Ethernet connection also allows customized control solutions! Even though ATEM SDI includes ATEM Software Control, you can use the Ethernet to control the ATEM remotely, anywhere in the world. A popular workflow is to use the Ethernet to allow the ATEM SDI to be positioned near the cameras, but the control is positioned remotely in a quieter space, such as a control room. Imagine using the switcher from a control room and building a professional broadcasting studio where the control room can be separated away from the performance or interviews. Ethernet allows you to add as many panels as you like all at the same time, or you can build custom solutions using the developer SDK!
Connect a HDMI Computer
If you need to connect computer graphics to ATEM SDI, then you can use a Micro Converter HDMI to SDI. Because the connection is direct, the quality is amazing! If you create graphics with a green background, then the ATEM Advanced Keyer will allow compositing titles over a live background! Computers also make fantastic media players!
HDMI Computer Connect a HDMI Camera
Connect a Blackmagic Pocket Cinema Camera 4K or 6K by using a Micro Converter BiDirect SDI/HDMI. It will convert the camera HDMI to the switcher SDI input. It can also take an SDI output of the switcher and embed the camera control into the HDMI data link back to the camera. This gives you tally and colour corrector control direct from the switcher!
Switch Faster with an ATEM 1 M/E Advanced Panel
With Ethernet built in, ATEM SDI can use hardware control panels for high end workflows that take advantage of the hidden broadcast features in the switcher! The ATEM 1 M/E Advanced Panel features the fast program/preview style with separate source buttons for both program and preview rows. Get direct access to all transitions automatically or manually using the t-bar. For accurate control of the DVE, the joystick provides X, Y positioning with rotation setting the DVE size. You also get LCD menus to control features that don’t have dedicated knobs and buttons. You can even program and trigger macros! Plus you can still use the hardware panel if you upgrade to a bigger ATEM switcher later!
Get Industry Standard Professional Camera Control
When working on live production, its critical all cameras are perfectly matched with good colour balance for a consistent look when transitioning between the each camera. The ATEM Camera Control Panel works with ATEM SDI and is the perfect solution for camera control. All control commands are sent to the cameras using the SDI camera control protocol which is supported by cameras such as Blackmagic URSA Broadcast and Blackmagic Studio Cameras. You get dedicated controls including CCU style joystick and controls for RGB camera colour, master gain, black, iris and more. Plus all controls are arranged in a familiar broadcast layout perfect for both experienced and new operators!
Compatible with Blackmagic Cameras, Panels, Decks and More!
ATEM SDI is even more powerful it can be expanded to grow with you. Add an ATEM Advanced Panel to get professional industry standard switcher control. Then add an ATEM Camera Control Panel for fast control and colour balancing of up to four cameras. For cameras, Blackmagic Studio Cameras make great studio cameras as they have tally and control all built into the compact and very portable design. For mastering, Blackmagic HyperDeck Studio recorders are perfect because they include popular file formats such as ProRes, H.264 and DNx. You can even live stream using an UltraStudio or Blackmagic Web Presenter! Then add a Micro Converter SDI to HDMI 3G converter for HDMI monitoring!
1.Blackmagic URSA Broadcast G2
Designed for broadcast and live production, you get a 6K sensor with +36dB of gain, wide dynamic range and B4 lens mount. Includes Blackmagic RAW, ProRes, H.264 and H.265 record file formats.2.Blackmagic Studio Viewfinder G2
Turn URSA Mini into the ultimate live camera with a professional 7 inch studio viewfinder!3.Blackmagic Camera Fiber Converter
Connect cameras to live switchers up to 2 km away with video, control and power, all over a single cable!4.Blackmagic Studio Fiber Converter
Connect to remote cameras up to 2 km away with multiple channels of video, control and power all over a single cable!5.Blackmagic Studio Camera 4K Pro
Designed for professional SDI switchers, you get all the features of the Plus model, as well as 12G-SDI, professional XLR audio, brighter HDR LCD and 10G Ethernet IP link.6.HyperDeck Studio HD Mini
Miniaturized deck records H.264, ProRes or DNxHD files onto SD/UHS-II cards or external USB disks in SD/HD formats to 1080p60. Includes timecode and reference generators, 3G-SDI in/out and HDMI out.7.HyperDeck Studio HD Pro
Includes all the features of the Plus model, and adds 2 SSD slots as well as the 2 SD card slots. Also includes machined metal search dial with clutch, SDI monitor out and XLR timecode connections.8.ATEM Camera Control Panel
Control up to 4 cameras at one time including iris, shutter speed, white balance, master gain, pedestal, RGB and more!Workflow
Create professional, broadcast quality programs and stream them live!
ATEM SDI makes it easy to create professional productions using multiple cameras and live switching because it’s really a powerful broadcast grade switcher! Plus ATEM SDI is extremely fast to setup! Simply connect a few cameras and you’re ready to start live streaming! You can use features such as the DVE for interviews where you need a picture in picture effect. There’s a wide range of video effects too! To live stream, all ATEM SDI models have a USB output that works like a webcam for streaming software, or the ATEM SDI Pro and Extreme models can live stream direct via Ethernet or even a smart phone! ATEM SDI even has separate microphone inputs for great sound when doing interviews.
Broadcast Studios
Connect multiple Blackmagic Studio Camera 4K Pro cameras to get the ideal setup for producing local news, college television, current affairs, talk shows and more! The Blackmagic Studio Cameras have all the features of a traditional studio camera such a large screen with built in tally, all in a compact design that’s easy to use! Its large 7″ viewfinder makes it easy to track and frame shots and you can even add optional focus and zoom demands to adjust the shot without taking your hands off the tripod! You can even connect the cameras using SDI or add our Blackmagic Studio Converter to connect via 10G Ethernet for a SMPTE fiber style workflow at a much lower cost.
Create and stream your own interview talkshow!
ATEM SDI is perfect for small streaming programs as it’s small enough to allow the presenter to do the switching! With 4 SDI inputs, you can connect 3 cameras for wide, medium and close up shots, along with a HyperDeck Studio to playback prerecorded clips. The DVE lets you create amazing picture in picture effects complete with drop shadows, coloured borders and more. Picture in picture effects are perfect when you want to show a reaction from the guest you’re interviewing! You can even add lower third graphics and logos to give your program a high end broadcast look. The streaming can be done on a separate computer via USB or directly on the ATEM SDI Pro and ATEM SDI Extreme models.
Unscripted Live Shoots
ATEM SDI switchers make it possible to produce unscripted studio shows, such as live cooking competitions or a bake off, at full broadcast quality. You can mix handheld URSA Broadcast cameras with shoulder kits and viewfinders, alongside tripod based cameras with URSA Studio Viewfinders. All of the cameras can be connected to an ATEM switcher so you can cut the show live. That’s because one person can perform the switching on the ATEM SDI itself, while someone else can do camera control on connected computers or an ATEM Camera Control Panel to balance colour, all working together! The program output can be recorded to create the master recording all in real time!
Create online training and educational tutorials!
Now you can transform your training room into a production studio! This lets you build an extensive library of training content to take your training online and global. For professional results, use two cameras, one presenter mid shot and one wide shot of the classroom. Use a third camera for a shot of the students! To get perfect quality slides, connect your PowerPoint computer to the SDI input via a Blackmagic Micro Converter HDMI to SDI converter. ATEM SDI has multiple SDI outputs allowing you to connect to recorders, projectors and monitors, plus on the ATEM SDI Pro and Extreme models you can record direct to USB flash disks. You can even live stream at any time!
Broadcast worship services via the internet!
ATEM SDI makes it possible for congregations of all sizes to spread their message by recording broadcast quality television programs. That’s because it’s the first live production switcher that a volunteer from the congregation can use! It’s affordable so even the smallest congregation can use video to engage with their community. Simply connect SDI cameras for shots of the minister and congregation, then connect a mic for the minister and you are ready to start recording. You don’t have to have a big budget or a huge staff! Plus you can also setup playback of past sermons on a projector at other times.
Stream Lectures and Seminars
ATEM SDI is ideal for streaming lectures from schools and universities to students around the world. The front panel has all the controls you need so even the lecturer can cut between a camera and a slide show computer. When you need to incorporate content such as video, slides or to show websites or coding, simply plug a computer into the ATEM SDI via a low cost converter. Because all video inputs have standards conversion, it doesn’t matter what video standard the inputs are. Just plug it in! The keyers allow school logos, teacher names, or other graphics to be overlaid on top of the image. The future of education is via online video content and ATEM SDI lets you start right now!
Live Sporting Events
ATEM SDI lets you create big league looking programs from your own sporting events! Whether you’re playing table tennis, bowling or baseball, ATEM SDI lets you connect multiple video cameras so you can capture the match from multiple angles and see all of the action. You can use the free ATEM plugin for Photoshop so you can update graphics templates and send them direct into the switcher media pool from Photoshop. Then you can use the built in downstream keyer to overlay the graphics on top of the game, just like a professional sports broadcast! With ATEM SDI, it’s easy for you and your friends to create broadcast quality live sports programming and stream online!
Create Music Videos Live!
Now it’s easy for bands to create music videos and to live stream concerts. Simply set up multiple cameras, allowing a wide shot of the group and close ups of each performer. With a built in Fairlight audio mixer featuring 6 band parametric EQ, compressor and limiter, you’ll get great sound. ATEM SDI has enough effects and keyers to create wild looks by blending in crazy animated sources such as the iTunes visualizer. Plus Blackmagic Studio Cameras include colour correctors so you can get dramatic and cinematic visual styles! ATEM SDI makes it easy to record music videos while also cultivating your band’s fanbase by streaming your live concerts to YouTube Live or Facebook.
Software Control
The world’s most advanced live production switcher control software!
ATEM SDI can be operated from the front panel, or you can control it using the included free ATEM Software Control for Mac or Windows. ATEM Software Control gives you even more control and creative options! You can switch video sources live, load the media pool with graphics, use transitions and keys, change switcher settings and mix audio. For larger live productions, you can even run multiple copies of the software so that more than one person can work on the show at the same time!
Elegant and Intuitive Interface
ATEM Software Control features an interface that’s been specifically designed for speed and accuracy. It features separate pages that make it easy to find the controls you need for each of the switcher’s major functions such as control, audio, macros, media and deck control. The switcher page features a familiar layout with buttons for sources, transitions, keyers and more. In addition the switcher page also has palettes that let you adjust transitions, keys and the media player. The media page lets you manage all of your graphic files and upload them to the switcher, while the audio page lets you control the built in multi channel Fairlight audio mixer.
Switcher
Adjust switcher settings, make live cuts,adjust keys, apply transitions, overlay graphics and more.
Media
Upload 20 RGBA still image graphic files. Graphics can be used for titles, bugs, lower thirds and more!
Audio
Professional 12 channel Fairlight audio mixer withfaders, 6 band EQ, compressor, limiter and much more!
Camera
Control and colour correct cameras via the SDI outputs to Blackmagic Studio Camera 4K models.
Switcher Control Full virtual switcher control panel!
You get the most efficient live production workflow with ATEM! The program bus is always live and allows direct source switching, so when you select a source it will immediately go on air. You can also take advantage of the advanced preview bus, which lets you make selections and preview them on a monitor before putting them on air. You can see what you have ready to go on air, and take it live with a press of the cut or auto buttons! Using the preview bus helps you see the next transition source so you can confidently control your live production.
Transition Control
The transition control block gives you fast access to quickly select transition styles and set timing on the fly during live production. Choose from mix, dip, wipe or even DVE transitions, then use the auto button to trigger transitions immediately when you switch sources, or use the fader bar for full manual control!
Upstream Keyer
When you need fast and seamless keying, the software controls allow precise adjustments. Green and blue screen backgrounds are never perfectly flat, so it’s vital to have powerful key controls that let you handle any kind of key! You get precise control of key parameters such as colour, spill/flare suppression, foreground colour correction and more
Downstream Keyer
ATEM SDI includes a downstream keyer for adding bugs, logos, and lower thirds to your program’s output stream. Simply load PNG, TGA, BMP, GIF, JPEG or TIFF images with an alpha channel into the media pool and send to the media player for keying! Because it’s downstream, it is perfect for graphics that you want to overlay onto your program video
Auto Transition
You can customize the duration of transitions, then use the auto button for smooth and perfectly timed transitions. When the auto button is turned on, switching between sources will automatically add the transition. Use auto for mix, dip, wipe, DVE and more! Auto changes to trigger transitions when set to program/preview switching.
DVE Settings
The ATEM SDI DVE can be used for more than picture in picture effects because you can use it for exciting DVE transitions! The transition palette in the ATEM Software Control app gives you precise control over all DVE options. Choose from over 16 dramatic DVE moves to add extra excitement to your production. DVE transitions can also be reversed!
Preview Transition
When program/preview style switching is selected, preview transition allows complicated multi layer green screen keys to be rehearsed before using them on air! Preview video can be seen on the multiview on ATEM SDI Pro and Extreme models. Using preview transition is the best way to ensure your transition is perfect before going on air!
Fade To Black
When your program is starting, has a commercial break, or is ending, use the fade to black (FTB) button to fade all layers up or down at exactly the same rate. Fade to black is the last layer of the switcher so you can be sure every video and graphic layer, and every source, is faded cleanly together and in perfect sync!
Camera Control
ATEM SDI can provide full control of your cameras right from the ATEM Software Control app! Simply connect a Blackmagic Studio Camera or URSA Broadcast G2 to get full camera control! All control communication is sent to the camera via to SDI program return. Control the tally light, white balance, ISO and shutter as well as the iris, focus and zoom on supported lenses. There’s a DaVinci primary colour corrector built into the cameras, so you can use professional colour grades for innovate with exciting digital film looks in live production. Software control allows both a traditional CCU layout and a DaVinci colour corrector layout. Plus for advanced use, you can add an ATEM Camera Control Panel.
Media Page
Drag and drop media to use it with your switcher!
Media Player
ATEM SDI features a media player that can be used to play back files stored in the media pool. The media pool stores your files on flash storage so they are saved in the switcher, even when the power is turned off! You can use PNG, TGA, BMP, GIF, JPEG and TIFF files. Files with alpha channels can be used as bugs, lower thirds, titles and more!
Media Pool
ATEM Software Control lets you drag and drop up to 20 RGBA graphic files into the media pool on ATEM SDI. Then the media player allows graphics to appear as a live video source! You can use the included Photoshop plug‑in to transfer graphics directly from Photoshop to the switcher, which is perfect for getting custom graphics on air quickly!
Audio Page – Professional multi channel audio mixer!
ATEM Control Software includes a built in multi channel Fairlight audio mixer that lets you independently adjust the level and balance from all of your audio inputs. The internal audio mixer features up to 20 channels of audio from the SDI and microphone inputs. Each input has independent 6 band parametric EQ, compressor, limiter, expander and noise gate as well as full panning. All inputs are metered so you can always see your source’s levels. There are buttons to turn audio on for each source in the program and for audio to follow video (AFV) when you switch between sources. There’s also a master fader for adjusting the final mixed program audio that is output to video.
Parametric Equalizer
Good equalization is the secret to good broadcast sound! The internal Fairlight audio mixer features 6-band parametric EQ onevery single input channel. You can adjust 6 separate bands of frequencies to boost, fatten or thin the sound. This means mic inputs can be adjusted to be clear and easy to understand while other inputs can remain untouched.
Dynamics Processing
The internal Fairlight audio mixer also features a high quality compressor, limiter, expander and noise gate on every audio input channel. The compressor and limiter stop mic levels from excessive volume and distortion. Noise gate eliminates background noise in mics. Dynamics really make it easy to place different channels in an overall audio mix!
Switcher Settings – Quickly customize switcher settings for your program!
Setting up for new jobs is easy with ATEM Software Control! Switcher settings are logically organized so you can change them quickly. By default the ATEM SDI will automatically select its video standard based on the device plugged into input 1, however you can also change the switcher video standard to any specific 720 HD and 1080 HD video standard. You can also customize input labels that will be used to track sources when used on external hardware panels or ATEM Software Control. Even the multiview can be customized including program/preview arrangement, audio meters and more! You can even control HyperDecks for remote trigger and use them for motion media playback!
Instantly Recall Setups
ATEM SDI lets you quickly save your switcher set up at any time which means you can recall it instantly! The switcher state is saved as an XML file so you can even edit the files to make changes. If you start to grow, you can use the XML setups from the ATEM SDI in other models of ATEM switcher, and you could even use the ATEM SDI XML setup file in the biggest ATEM Constellation switchers. You can save the switcher state any time you like, or you can set up ATEM Software Control to auto save at regular intervals and the older versions of the files are kept. When saving the switcher state, you save not only the settings, but all of the media pool contents as well! It all just works!
Create Macros
Macros let you automate complex sequences of actions on your switcher that would be difficult to do during a live production if you have to press multiple buttons manually. You can record transitions between sources, key effects, graphics and more. Simply open the macro window, select record and operate your switcher like normal. Your actions are automatically stored in your ATEM SDI and can also be stored as XML files so you can edit and combine multiple macros together. To use a macro, just press the macro button! Macros are also available on external hardware panels so you can trigger a macro from multiple locations, as well as ATEM Software Control.
HyperDeck Contol
ATEM SDI works with Blackmagic HyperDeck Studio recorders so you can use pre‑recorded clips in live programs! You can connect up to 4 HyperDecks as sources, see a list of clips on each one, select a clip, cue it, pre-roll, and play it back at any time. It’s perfect for adding pre-recorded spots, promos, credit rolls and more to your live program! Imagine setting up a HyperDeck to play advertising spots at events, all rolautomated with HyperDeck control and macros! HyperDecks could even be used to generate fun backgrounds for music videos as well as animated backdrops to key people over, all perfectly in sync!
Multiple Users
Producing large live events such as sports, concerts, worship services, and educational events requires a high performance team of multiple creative people working seamlessly together. ATEM SDI’s Ethernet connection means multiple control panels can be used all at the same time. You can run multiple copies of ATEM Software Control where different people can switch, manage media, mix audio and control cameras, all on different computers so they don’t interfere with each other while working. Even hardware panels can be added for the best workflow for when you’re working on a big live event. You can even run software remotely over the Internet from any location on the planet!
Getting Started
Understanding ATEM SDI Learn how to get started with live production today!
With ATEM SDI, it’s never been easier to get started with live streaming and multi camera video production! This section will show you how to connect and set up an ATEM SDI switcher so you can create your first live stream! ATEM SDI is a compact broadcast switcher that lets you switch 4 or 8 SDI video sources depending on the model, plus 2 dedicated audio sources. The USB output looks like a regular USB webcam that you can use with video software. ATEM SDI’s built in control panel has all the controls you need to make switching programs easy. Then if you want more power, just run ATEM Software Control to get access to the full feature set of ATEM SDI to create incredible effects and titles.
Setting up your ATEM SDI
Setup 1 Connect Power
The first step is to plug in the power supply using the supplied power adapter. However most 12V power supplies will work fine, or even a 12V DC battery source will work fine. If you have a locking DC connector, then make sure to tighten it firmly.
Setup 2 – Connect Monitoring
The ATEM SDI Pro or Extreme models have a multiview so you can see it if you connect a monitor to the SDI out. Make sure you press the M/V button on the video output selection. Now you can see all your sources as you plug in cameras!
Setup 3 – Plug in Video Sources
Next, plug your SDI cameras into ATEM SDI’s video inputs. This gives you 4 or 8 different video sources depending on the model, to switch between when creating your program. All the SDI inputs are standards converted so don’t worry about settings!
Setup 4 – Connect a Computer
If you’re streaming, then all models use USB as a webcam. First connect the USB to a computer. Your computer will recognize ATEM SDI as a webcam and you can then select it as the webcam source in your streaming software, such as Skype.
Setup 5 – Stream Video
Skype is a good app for testing, so let’s configure it for ATEM SDI. In Skype audio and video settings select Blackmagic Design as the video and audio sources. You will see the ATEM SDI video in the preview window and you can make calls!
Switching Between – Cuts and Effects Transitions
Now that you have your cameras connected, you can start switching your program! It’s as easy as just pressing the input buttons to switch between sources. You’ll see the cuts are smooth and professional looking. To transition with a video effect, simply press AUTO so selecting input buttons will use a nice transition. Because cut is the most popular transition, there are dedicated buttons for cut and auto transitions. You can change the transition that’s used by pressing the buttons above the AUTO button. You can choose between mix, dip, DVE push, DVE squeeze, and vertical and horizontal wipes. Of course there are a lot more transitions available when using ATEM Software Control!
Selecting the Best Transitions
Before creating your first program, it’s worth thinking about the type of transitions available. From a creative point of view, a mix transition can feel very elegant as it gradually fades from one source into the next, while slower mix transitions can feel dreamy and gentle. A wipe transition will move a line across the original source revealing the next source and it has a different feel depending on the amount of soft edge you set in the wipe parameters. You can even set a wipe with a border that uses a colour or even live video! DVE transitions are a lot of fun and they move the whole image during the transition, so they can feel crazy and exciting, making them perfect for kids shows!
Superimpose a Picture in Picture Overlay
Picture in picture superimposes a video in a small box that you can position and customize over your main source. To do this you use the digital video effects processor, or DVE. The DVE uses input 1 for its default source, so if you’re broadcasting gameplay and want to superimpose your reactions, plug your camera into input 1. Make sure your game console uses one of the other inputs. To enable picture in picture just select it on the control panel. As the DVE uses the upstream keyer, you also need to turn off the key. There are buttons on the front panel to set the position of the DVE. You can also fully customize the position, borders and light source by using ATEM Software Control.
Voiceover or Narrate your Broadcast
If you need to narrate or add commentary to your production, plug a microphone into one of the 3.5mm mic inputs. Or use two microphones for broadcasting interviews so you can individually control how loud or quiet they are. Above each video input button is the smaller audio control buttons where you can turn on and off each audio source. There are many types of microphones available, such as tiny, wireless collar microphones so the presenter can move freely without cables or larger desktop ones for presenters. Using dedicated microphones as well as using the audio page in the ATEM Software Control to add EQ and some compression can dramatically improve the clarity of presenters.
Extreme Power with ATEM Software Control
If you really want to access all the power of your ATEM SDI, then you can run ATEM Software Control and get access to many more features than are available on the front panel. There are pages that let you run the switcher and pallets that have settings for every feature in the switcher. There are also pages in the software for changing settings, uploading and managing graphics, mixing audio and controlling cameras. Just connect the USB to a Mac or PC and run the software, as it uses the same USB connection that the ATEM SDI’s webcam output uses. You can also use ATEM Software Control via Ethernet if you have more than one operator working on the same job at the same time.
Switcher
Adjust switcher settings, make live cuts, adjust keys, apply transitions, overlay graphics and more.
Media
Upload and manage up to 20 RGBA graphic files. Graphics can be used for transitions, as bugs, lower thirds and more.
Audio
Professional multi channel Fairlight audio mixer with faders and meters for every input and the master level control.
Camera
Remote control your cameras, including tally, camera settings and colour balance!
Managing Live to Air Graphics
You can use any graphics software to create titles for ATEM SDI. If the graphic has an alpha channel, ATEM SDI will output the alpha as a key channel to allow graphics layering. Graphics with alpha channels can be created in software such as Photoshop. To use a still graphic, simply drag and drop it into one of the positions in the media pool in ATEM Software Control. Now go to the keyer settings in the switcher page, where you will need to set the media player source to be the still you just loaded. Then in the keyer settings, select the video and key sources to be the media player. Now turn on the keyer and you’ll get professional titles overlaid in real time on your live video.
Create Broadcast Quality Mastered Audio
You can create professional mastered audio using the Fairlight audio mixer in ATEM SDI and controlled through ATEM Software Control. By clicking and dragging the mixer faders you can adjust the sound levels for each camera so they are louder or quieter, or adjust the microphone levels so voices are clearer and stand out. If a music player is plugged into the second mic input, you can even fade music in and out of your broadcast because each mic input has its own audio mixer inputs and effects! If you want to go even further, you can add Fairlight EQ, audio compression and limiting to tailor the sound of presenters to get them sounding clear and to keep the audio levels under control.
Assign SDI Out for Monitoring!
The SDI outputs of ATEM SDI can be changed, on professional switchers this is called an aux output. You can also loop a computer slide show and a projector through ATEM SDI, allowing access to the slide show as one of your sources. You can select preview out and set the switcher to program/preview switching to allow you to preview shots before going on air. On the ATEM SDI Pro and Extreme models, you can even select a multiview out for full multi camera monitoring. Being able to see shots before using them on air means you eliminate mistakes. If you are broadcasting gameplay, input 1 can be set to zero latency allowing ATEM SDI to be looped between the console and the gamer’s monitor.
Start Streaming Video via Ethernet
If you want to live stream and you have the Pro or Extreme models, you can stream direct using the Ethernet connection. Once you have connected Ethernet to the internet, first request a streaming key from the streaming service. In the ATEM Software Control switcher page output palette select the streaming service you want to use, and the server you want to use choosing the server closest to your location, and enter the streaming key. Generally select the highest quality, unless you have speed limited internet access. Now press the on-air button on the panel and you should see your program video live to your streaming service. On this model you can see your streaming status in the multiview!
Record your Live Broadcast
You can record using the SDI output and recorders such as the HyperDeck Studio, allowing you to upload your television shows later, or to archive your production history. There are also loads of software tools for recording webcam video so you can use this software to record from the USB on a computer. However on ATEM SDI Pro and Extreme models, you get recording features built into the switcher itself! All you need to do is connect a USB flash disk and then press record on the front panel! ATEM SDI Pro and Extreme also support recording to more than one USB disk, such as a Blackmagic MultiDock, so you can keep recording to a second disk when the first disk becomes full.
Remote Control Blackmagic Studio Cameras
If you have Blackmagic Studio Cameras then you can control them from ATEM SDI! Control is sent back to the camera via the SDI out connected to the cameras’ program return. Now you can go to the ATEM Software Control Camera page to get a CCU style interface where you can adjust and match your cameras. Move the main CCU control up and down to control the iris and left to right adjusts the black level. It’s the same as a broadcast CCU! There are also controls for colour tint to balance the cameras. Plus you can set the focus, gain and shutter speed of the camera. To access DaVinci colour correction, select the DaVinci icon to open up full colour wheel primary corrector controls.
Build Complex Effects with Macros
You can also use ATEM Software Control to build macros. Macros are useful for recording a sequence of switcher actions so you can repeat them with a single click of a mouse. For example you could record a combination of switcher actions that transition between several camera sources, switch a graphic to air, and adjust audio levels all in one single macro that can then be played at any time. Macros can be as simple or complex as you want and are extremely powerful when used in a live production. Your actions are automatically stored as an XML file that can be edited and combined together. To use a macro, just click run on the Macro palette in the software switcher settings!
The Next Step – Now it’s time to grow and learn more!
ATEM hardware panels are external control panels that can be used for additional control over ATEM SDI. Even though ATEM SDI is an extremely powerful broadcast switcher all by itself, an external ATEM hardware panel gives you extra power. Connecting an ATEM hardware panel to ATEM SDI’s Ethernet port lets you operate the switcher from a different location such as a control room. That keeps ATEM SDI closer to the cameras and the SDI cables shorter. Professional control, such as an ATEM 1 M/E Advanced Panel, has physical buttons and controls so it’s much faster to use. There are so many things ATEM SDI can do! It’s a great idea to check the ATEM SDI instruction manual to learn more!
Editing
Edit a Live Production!
ATEM SDI Pro ISO and Extreme ISO models have been designed to integrate into DaVinci Resolve so you can spend time making your program absolutely perfect! A DaVinci Resolve project is saved along with separate files for each video input, so the live event can be reconstructed as an edit timeline. Often live production is chaotic and unpredictable, but now you can fix edits and replace shots! You can spend as much time as you need! You can also use skilled artists to help, such as colourists, audio engineers and graphic designers. With the combination of ATEM SDI ISO models and DaVinci Resolve, it’s easy to make quick changes and upload, or major creative enhancements, of your live event!
Single Click – DaVinci Resolve Edit Timeline
When recording ISO files, you also get a DaVinci Resolve project file with your live production as an edit timeline! This means with a single click, you can open your live event and see it transformed into an edit with all cuts, transitions and media on the timeline. With all the timeline clips linked back to the input “ISO” recordings, you have complete freedom to change edits and replace shots. You also get total freedom to use the editing, colour correction and visual effects tools built into DaVinci Resolve. Now live production won’t be so unpredictable! Plus there are no delays as it only takes seconds to open the project, adjust a few edits and then render out a new perfect master file.
Quickly Trim Edits
Trimming edits in DaVinci Resolve is incredibly easy because the trim tools are automatically selected depending where you click and drag your mouse on the timeline’s edit points. Click and drag to either side of the edit to trim a clip. Then click the mouse in the middle of the edit to roll the edit point. If you’ve imported your ATEM SDI timeline, be careful not to ripple your edits so they aren’t out of AV sync! The cut page also has buttons to add and remove dissolves quickly. You can even add smooth cut transitions so the advanced AI algorithm will smooth and remove jump cuts. That lets you edit out presenter mistakes while keeping the action smooth and the edits invisible.
Improve Edit Flow
Live production can be chaotic so it means it can be hard for the switching to keep up with the fast moving action. Or sometimes you can even miss important shots. A good example is a live interview where guests are debating and it can be difficult to keep up with the person speaking. This means if you cut to a person after they start speaking, with editing it’s easy to roll the edit points back in time. You can roll each edit point slightly back, allowing the camera to cut to a speaker just before they start to talk. This means you can make debates flow much more smoothly. Trimming edits on a DaVinci Resolve Editor Keyboard is even faster because you can trim live with the search dial!
Browse and Add Interesting Shots
Finding exciting replacement shots is easy because you have access to every ATEM input’s recordings. Select source tape in the cut page to see all your clips loaded sequentially into the viewer so you can visually scroll through all your media! Now you won’t miss any exciting shot! If you find an alternative shot, then use source overwrite to use it. Simply select source overwrite and the clip in the viewer will be added to the timeline automatically with timecode synced to the shot you want to replace. You don’t even need timeline in and out points because source overwrite will edit the clips in sync. Simply scroll along your media and use source overwrite to add multiple exciting cutaways!
Perfect for DaVinci Resolve Sync Bin
DaVinci Resolve’s cut page has a unique scrolling style of multi-cam called the sync bin. It works by showing only clips that are synced to the timeline and as you scroll the timeline, the available clips will be displayed for you. As all ISO clips have timecode, the DaVinci Resolve sync bin will take care of keeping all shots scrolling together in perfect sync. Clips are displayed in a multiview so you can select the shot you want by clicking on its view. The in point is automatically set and for the out point, just scroll along and then press O. Now select source overwrite to add the shot into the timeline. Sync bin makes adding cutaways easy as it works just like a switcher!
Includes ATEM Media Pool Images
When recording inputs, media pool graphics are also saved so your titles and stills are included in the edit when the timeline is opened. Only titles used in your live production will be saved, and they will be placed on layer two of the timeline if they’re keyed titles, or layer one if media pool graphics were used as a video source. You can remove, change and localize titles because they are not baked into the edit! Because ATEM SDI only supports still frame graphics in its media pool, you can use the edit to change these still frames to animated titles! You can even update titles with new designs so you can renew your older work to make it look more modern. Or add 3D titles using Fusion!
Relink to Blackmagic RAW Camera Files
If you’re using Blackmagic Studio Camera 4K Pro, you can record Blackmagic RAW in camera and these files will also be in sync because ATEM SDI ISO models will upload metadata and timecode sync to the cameras via the SDI connections. This means you can change DaVinci Resolve to use the Blackmagic RAW files instead of the H.264 ISO files for higher quality. Blackmagic RAW files are film gamma so you can add creative colour correction for cinematic looks. Plus because the files are 4K, you can change the DaVinci Resolve project to Ultra HD and get an Ultra HD edit from an HD ATEM SDI ISO switcher! Any non camera input, such as a computer, will be upscaled automatically!
Create Ultra HD Programs with Blackmagic RAW
Blackmagic RAW allows a whole new world of creativity because you can stream in HD, but then deliver work in Ultra HD with incredible creative and cinematic colour correction. Blackmagic Studio Cameras feature high resolution sensors and amazing low light performance. This means the Blackmagic RAW files will capture the greater range of the sensor, while the output of the camera is connected to your ATEM SDI for the live stream. Higher resolution also means you have added flexibility to reframe and zoom shots and you won’t lose image quality because the files have so much extra detail. DaVinci Resolve will take care of all the work for you and let you deliver Ultra HD masters!
Add DaVinci Colour Correction
DaVinci Resolve is Hollywood’s most popular professional colour corrector and is used on more feature films than any other solution. The primary colour corrector has familiar colour wheels that let you balance the colourus in the dark, midrange and highlight parts of your images. You can even add some extra contrast by setting specific shadow and highlight points. DaVinci Resolve has other controls that extend creativity such as highlight, pivot, colour boost and more. If a camera moved when you needed it, then you can add stabilization! Plus secondary grading allows you to change any specific colour. There’s also curve grading, power windows with tracking, multiple corrector nodes and more!
Advanced Panels
Extreme Power Even ATEM SDI can use professional broadcast style workflows!
For the ultimate in professional control you can add an optional ATEM hardware panel! Although ATEM SDI costs less than the hardware panel itself, it’s a great next step as you grow because the hardware panel is the interface you spend most of your time touching and interacting with! The ATEM 1 M/E Advanced Panel opens up the power of your ATEM SDI because it has many more controls and functions than the ATEM SDI front panel. There’s simply no faster way to work because you have physical broadcast quality buttons, knobs and a t-bar fader so you can manage very complex live jobs. You can also move the panels to any other ATEM switcher for even more elaborate work in the future!
ATEM 1 M/E Advanced Panel – Super compact professional hardware control panel with built in LCD
ATEM SDI might be low cost but it’s not a low end switcher! The ATEM 1 M/E Advanced Panel is a true broadcast quality hardware panel that is a faster and more professional way to use your ATEM SDI. Featuring the latest technology, you get a built in LCD for menus, high quality buttons with customizable illumination colour, a professional joystick for the DVE plus a smooth, weighted T-bar fader for manually controlling transitions. The buttons also have LCD screens allowing custom labels to display under each input button! The compact size and durable design of the ATEM 1 M/E Advanced Panel fits in a standard equipment rack, making it perfect for portable broadcast vans and fly away kits.
Accelerate live production! Production is easierand fun with an ATEM control panel!
Select Sources – Switch cameras to air instantly!
ATEM SDI has been designed to give you the most advanced live production workflow. Internally, ATEM SDI has separate program and preview buses that you can use to quickly and accurately switch sources. ATEM SDI lets you see your preview bus selection by selecting preview on the video output, or using one of the views on the ATEM SDI Pro or Extreme model’s multiview output. Any selections on the preview bus will appear on your preview view, allowing you to see your source before it goes on air. Then you can bring the source online by pressing cut or auto! You can also switch sources on the program bus if you need them to go live immediately!
Transition Control – Select and customize transitions
Get total control over your transitions with a dedicated hardware button for each transition type! When selecting transition types, the LCD screen will display the options for that transition, so you can change its parameters without navigating through complex menus. It’s all instantly available! That gives you multiple ways to switch. Simply select a new source on the preview bus, then press CUT for a cut transition, or AUTO to use the selected transitions such as mix, dip, wipe or DVE! You can even cut directly on the program bus. With ATEM 1 M/E Advanced Panel you get all the controls you need to access all transition types fast.
Transition Styles – Mix, dip, wipe, DVE and more!
ATEM gives you a huge range of transition styles! Mix transition will smoothly blend between sources just like an NLE cross dissolve. Standard SMPTE wipes are included and wipes can have edge softening for smooth dreamy transitions that are more exciting than simple cross dissolves. Dip transitions create a dip to colour effect, however because you can dip to any video source, you could create really innovative effects! DVE transitions use the DVE to create crazy moves where the whole foreground image moves! Plus you can combine the DVE and a still image from the media pool to create graphic wipes! The t-bar fader even lets you manually position the transition for total control!
Wipe Transitions – Transform wipes into exciting effects!
Power up your wipe transitions by accessing parameters to transform them into exciting effects. While you can select the wipe pattern directly on the LCD, you can also add lots of customization to suit your production style. You can adjust parameters such as symmetry and softness, but there are also adjustments for coloured borders with variable width and softness, as well as the position of the centre of the wipe. You can even use the dedicated joystick to set precise wipe pattern positioning!
DVE Transitions – Amazing digital video effects
The ATEM hardware panel is perfect for positioning the DVE for custom picture in picture effects. The built in joystick allows the position to be precisely set and rotating the knob will change its size. You can also use the soft knobs and menus on the LCD to adjust the DVE position, size and other DVE features such as lighting and drop shadow effects. You can also set up the DVE to fly graphics into frame or select any of the pre programed push and squeeze transitions.
Keyer Control – Get perfect green screen keying
Hardware control is ideal when doing chroma keying because you can finely adjust the parameters for clean key edges so you get seamless multi layer compositing effects. Unlike software control where you need to look at the user interface, the ATEM hardware panel has control knobs that you can hold while adjusting key parameters and looking at the video output live to ensure the key is seamless. Only fine adjustment of key settings live while watching the video, ensures your key is perfect.
Fader Bar – Manually blend transitions
Amazing live performances often require transitions that need to be controlled manually. The ergonomically designed t-bar control lets you ride transitions perfectly as part of the live performance! Sometimes the emotion of a live event means you need to feel a transition to get it perfectly in sync with the camera operators and talent. Like a conductor, your ATEM SDI is part of the performance and drives the mood as the production unfolds.
Auto Transition – Perfect and predictable transitions!
Just below the ATEM broadcast panel fader bar is the auto transition button. Selecting auto will instantly perform the transition type you have set. This ensures you can accurately select your source and transition type before triggering the action, so you always know what is going to happen and there’s much less chance of mistakes going to air. Auto transitions can be programed for durations from 1 to 250 frames and the benefit is each transition is consistent through your program.
Preview Transition – Simulate new effects while on air
Unlike the smaller front panel on ATEM SDI, the hardware panel includes a very useful preview transition button that lets you simulate a transition or effect before you use it! The PREV TRANS button helps you avoid on air mistakes when preparing live transitions by displaying the result on your preview video output or on the multiview screen on the ATEM SDI Pro and Extreme models. Preview transition is the only way to accurately set up complicated transitions and multi layered key effects.
Fade to Black – Finish your program with style!
The built in fade to black button controls the entire output of the switcher! Selecting fade to black (FTB) will smoothly fade your program output to black at a preset transition rate. Because FTB is at the end of all processing, it ensures all video layers fade out together. You can even select to fade out audio when FTB is triggered. That’s useful for the start and end of your production or for fading out to commercial breaks. FTB also includes button guards to stop accidental triggering!
Joystick – Get precise DVE control
Move elements around the screen just like a video game using the Joystick! With full 3 Axis control you can adjust X, Y and Z positions of wipe patterns and position the ATEM SDI DVE. The joystick control with the DVE is ideal to position live video over video. Scale the size, position up down or left and right for the perfect picture in picture effect. You can also use the joystick to move the DVE and enter start and end keyframe screen positions for your own customized animated DVE moves.
System Control – Change switcher settings from the menus!
You get full control of all switcher settings right from the panel, which is perfect when operating the hardware panel in a control room while the ATEM SDI stays close to the studio and the cameras. You get a large LCD for setting menus with soft keys and control knobs to help you make setting changes quickly. The menus are easy to navigate and arranged in specific functions. You can adjust the switcher’s video standard, video output settings, multiview layout and even remap panel buttons!
Change video outputs with a single button press
The ATEM 1 M/E Advanced Panel has a dedicated “select bus” for control of the ATEM SDI video outputs. The ATEM SDI video outputs are the same as a professional switcher aux outputs, so you can select sources to the SDI output live! Conveniently located in the top button row the select bus lets you directly press sources to output to the ATEM SDI video output using a single button press. There are even labels to show you what source is on each button. The select bus also lets you directly select inputs for other internal processing such as the keyers and DVE. Only the select bus lets you route signals internally and to the SDI outputs on your ATEM SDI instantly!
Media Players Manage built in graphics and titles
You can select stills from the media pool in the panel LCD menus and simply pressing the media button lets you access the media player and change which image in the media pool is sent to the media player as a video source. You can select any loaded still by scrolling through the list of media pool images, which are listed showing the original file name of each image. This means you can quickly change stills and titles right from the same panel you are working on, eliminating the need to change control panels just to change a title.
Fairlight Audio Mixer Integrate with third party audio panels
All ATEM switchers are compatible with Mackie™ protocol USB control panels for live audio mixing! Simply connect a third party USB fader panel to your Mac or PC computer to get real time fader control of every audio channel. As you adjust levels on the panel the virtual software faders move in sync with you. You can even use the mouse to adjust levels on the ATEM Software Control page and the flying faders on the external panel will track your movement. Combining a fader panel with the built in mixer gives you the highest quality audio mixing experience.
Powerful Custom Macros Trigger macros at the touch of a button!
A hardware panel is perfect for macros because it’s much faster and you can view pre programed macros and record and play back macros at the push of a button. This means that you don’t need to use a computer to work with macros because you can trigger them from the same hardware panel you are switching from. If you edit or modify a macro the change will appear on all connected hardware and software control panels because the macros are stored inside the ATEM SDI itself. But the panel also includes dedicated macro buttons so you can set up different macros under each macro button and then trigger them instantly at the push of a button!
Customizable Control Options – Control your ATEM SDI from anywhere in the world!
Because ATEM SDI includes a standard Ethernet connection, you can use this connection to control it remotely from long distances away on Mac or Windows computers running ATEM Software Control. ATEM Software Control can use the USB or Ethernet connection to ATEM SDI, so while the USB is easy, Ethernet gives you unlimited distance between the switcher and the control panel. You can also connect a range of hardware and software control panels in any combination, all working together in parallel and at the same time. You can even connect an ATEM SDI to your network and control your switcher from anywhere in the world or use the included SDK to develop your own solution!
SoftwareSoftware control lets you control your ATEM locally or using the internet for control from anywhere in the world!
Internet
Connect any combination of hardware and software switcher control simultaneously for multi user workflow.
Free SDK
Custom develop your own control solutions by using our software developer kit included free with every ATEM switcher!
Camera Control
Remotely control four cameras, all from a single control panel!
The ATEM Camera Control Panel is a professionally designed broadcast camera control unit that extends the software features in ATEM Software Control to add high quality physical hardware controls that are much nicer to use. All ATEM SDI models support camera control when used with the Blackmagic Studio Camera models for amazing professional broadcast workflows. The control panel lets a single person monitor and adjust a wide range of camera parameters such as black levels, gain, colour balance, shutter speed and more. This leaves your camera operators free to focus on more important tasks such as framing and shot composition. Plus it works with all ATEM switcher models!
Works with Blackmagic Studio Camera
ATEM SDI works with the latest Blackmagic Studio Cameras to add studio features that you can remotely control! Studio Cameras are designed for live production as because they feature a large bright 7″ viewfinder, remote camera control, large tally indicator, sunshade and phantom powered microphone connections. All video and control is via the ATEM SDI outputs to the SDI program return input on the camera. That means you can remotely control any setting in the camera plus focus, iris and zoom on supported lenses. Blackmagic Studio Cameras include a DaVinci primary colour corrector so you get much more than simple CCU controls as you can also do a full colour grade in the camera!
Control 4 Cameras Simultaneously!
When working on live production, it’s important all of the cameras are matched with proper colour balance so that you get a consistent look as you cut and transition between the different cameras. The ATEM Camera Control Panel features 4 camera controllers in one panel, so you can control all of your ATEM SDI cameras. When used on larger switchers, you can control more cameras because it’s very quick to change numbers on each control channel. Each camera controller includes a large LCD screen with soft buttons and knobs at the top of the panel, and a full set of professional controls below, so you get a very clear indication of the most important camera parameters.
Scene and Camera Controls
The top section on each camera control has settings for changing camera settings, plus it lets you save and recall scene presets. Getting remote access to important camera settings is vital when you are working in conditions where the light can change during your job such as daylight, and with these settings you can quickly adjust cameras based on changes in the scene. Controls in this section include master gain, white balance, shutter speed and more!
White Balance
Quickly get the perfect white balance by triggering the camera’s automatic white balance feature.
Load Scenes
Save and recall scene presets, perfect when you do regular work with the same conditions each day.
Master Gain
Boost sensitivity of the sensor as conditions become darker or when more depth of field is needed.
Shutter Speed
Set the shutter speed of the camera and a slower shutter speed can also boost brightness in dark conditions.
Colour Bars
Select to output colour bars for the selected camera. Colour bars are very useful when setting up for a new job!
Gain and Pedestal Controls
The center section features independent RGB controls for adjusting the camera colour for the white and black parts of the image. Because the Blackmagic Studio Camera models have a full DaVinci Resolve primary colour corrector built in, you have amazing control over the colour in the camera. These red, green and blue controls for adjusting blacks and whites mean you can accurately match multiple cameras, which is vital for cutting seamlessly without colour shifts. One trick experienced camera control operators use is to only adjust the red and blue channels, so you can add and remove red and blue tint without getting too far away from accurate colour!
White Balance
Independent RGB controls for adjusting the white part of the image.
Black Balance
Independent RGB controls for adjusting the black part of the image.
Lens and Iris Controls
The lower section of the panel is where the most used controls are located and features a large easy to read camera number that highlights red when the camera is on air! The main control for operating the cameras is the high quality professional joystick that’s used to precisely adjust the iris when moved up and down, and the master black when the knob is rotated. This is the exact same type of control that’s used on camera control units used in broadcast, so you get a true professional user interface that can be the ideal training tool for any high end live broadcast truck or studio. There’s also a button to lock the CCU and indicators for network and errors.
Iris Control
Joystick for adjusting iris and master black. Move up and down to change iris and rotate for black.
Coarse ControlTo stop the iris from becoming too sensitive with different lens types, you can reduce the adjustment range.
Lock Controls
To ensure you don’t accidentally bump the camera adjustment, you can lock the iris and master black control.
Master Black
This indicator provides feedback on the amount of master black adjustment applied to the remote camera.
Panel Active
If you have set up a perfect colour match between all of your cameras, then you can lock all panel adjustments.
Status Lights
Used on larger switcher models, these lights indicate status of network and SMPTE fiber camera connections.
Preview
Used for switching the camera feed to the video output, so you don’t have to move the joystick.
Camera NumberBig camera number display shows you what camera is assigned to each channel and turns red when on air!
Call Button
Flashes tally light on the camera to get the attention of the camera operator that you need to talk to them.
Expand Your Production Workflow Works seamlessly with all ATEM control panels!
Adding the ATEM Camera Control Panel to your ATEM SDI is easy as all the network settings have been assigned for you, so you can simply connect an Ethernet cable direct from the ATEM Camera Control Panel to the ATEM SDI’s Ethernet connection. Because Ethernet is a network, you can also use the ATEM Camera Control Panel with the ATEM 1 M/E Advanced Panel for an incredibly advanced live production setup that works the same as the biggest switchers in the world. The ATEM panels feature loop through Ethernet connections so you just loop through the panels. Plus, if you add bigger ATEM switchers later, you can keep using the panels, or even move the panels between switchers for different jobs.
True Broadcast Camera Control – ATEM SDI is the tiny switcher that’s big on features!
Just because ATEM SDI is a small and low cost switcher, it doesn’t mean it’s small on the inside! ATEM SDI is an absolutely massive switcher for features and adding ATEM hardware panels gives you a professional workflow that’s used by broadcasters worldwide. If you’re doing paid work, need a professional system for education or just want the speed of a hardware panel then the ATEM Camera Control Panel is well worth the investment. The ATEM Camera Control is incredibly fast to use as it features traditional CCU controls so you get the benefit of years of broadcast experience. Now you can get the same workflow that broadcasters use with ATEM SDI and Blackmagic Studio Cameras!
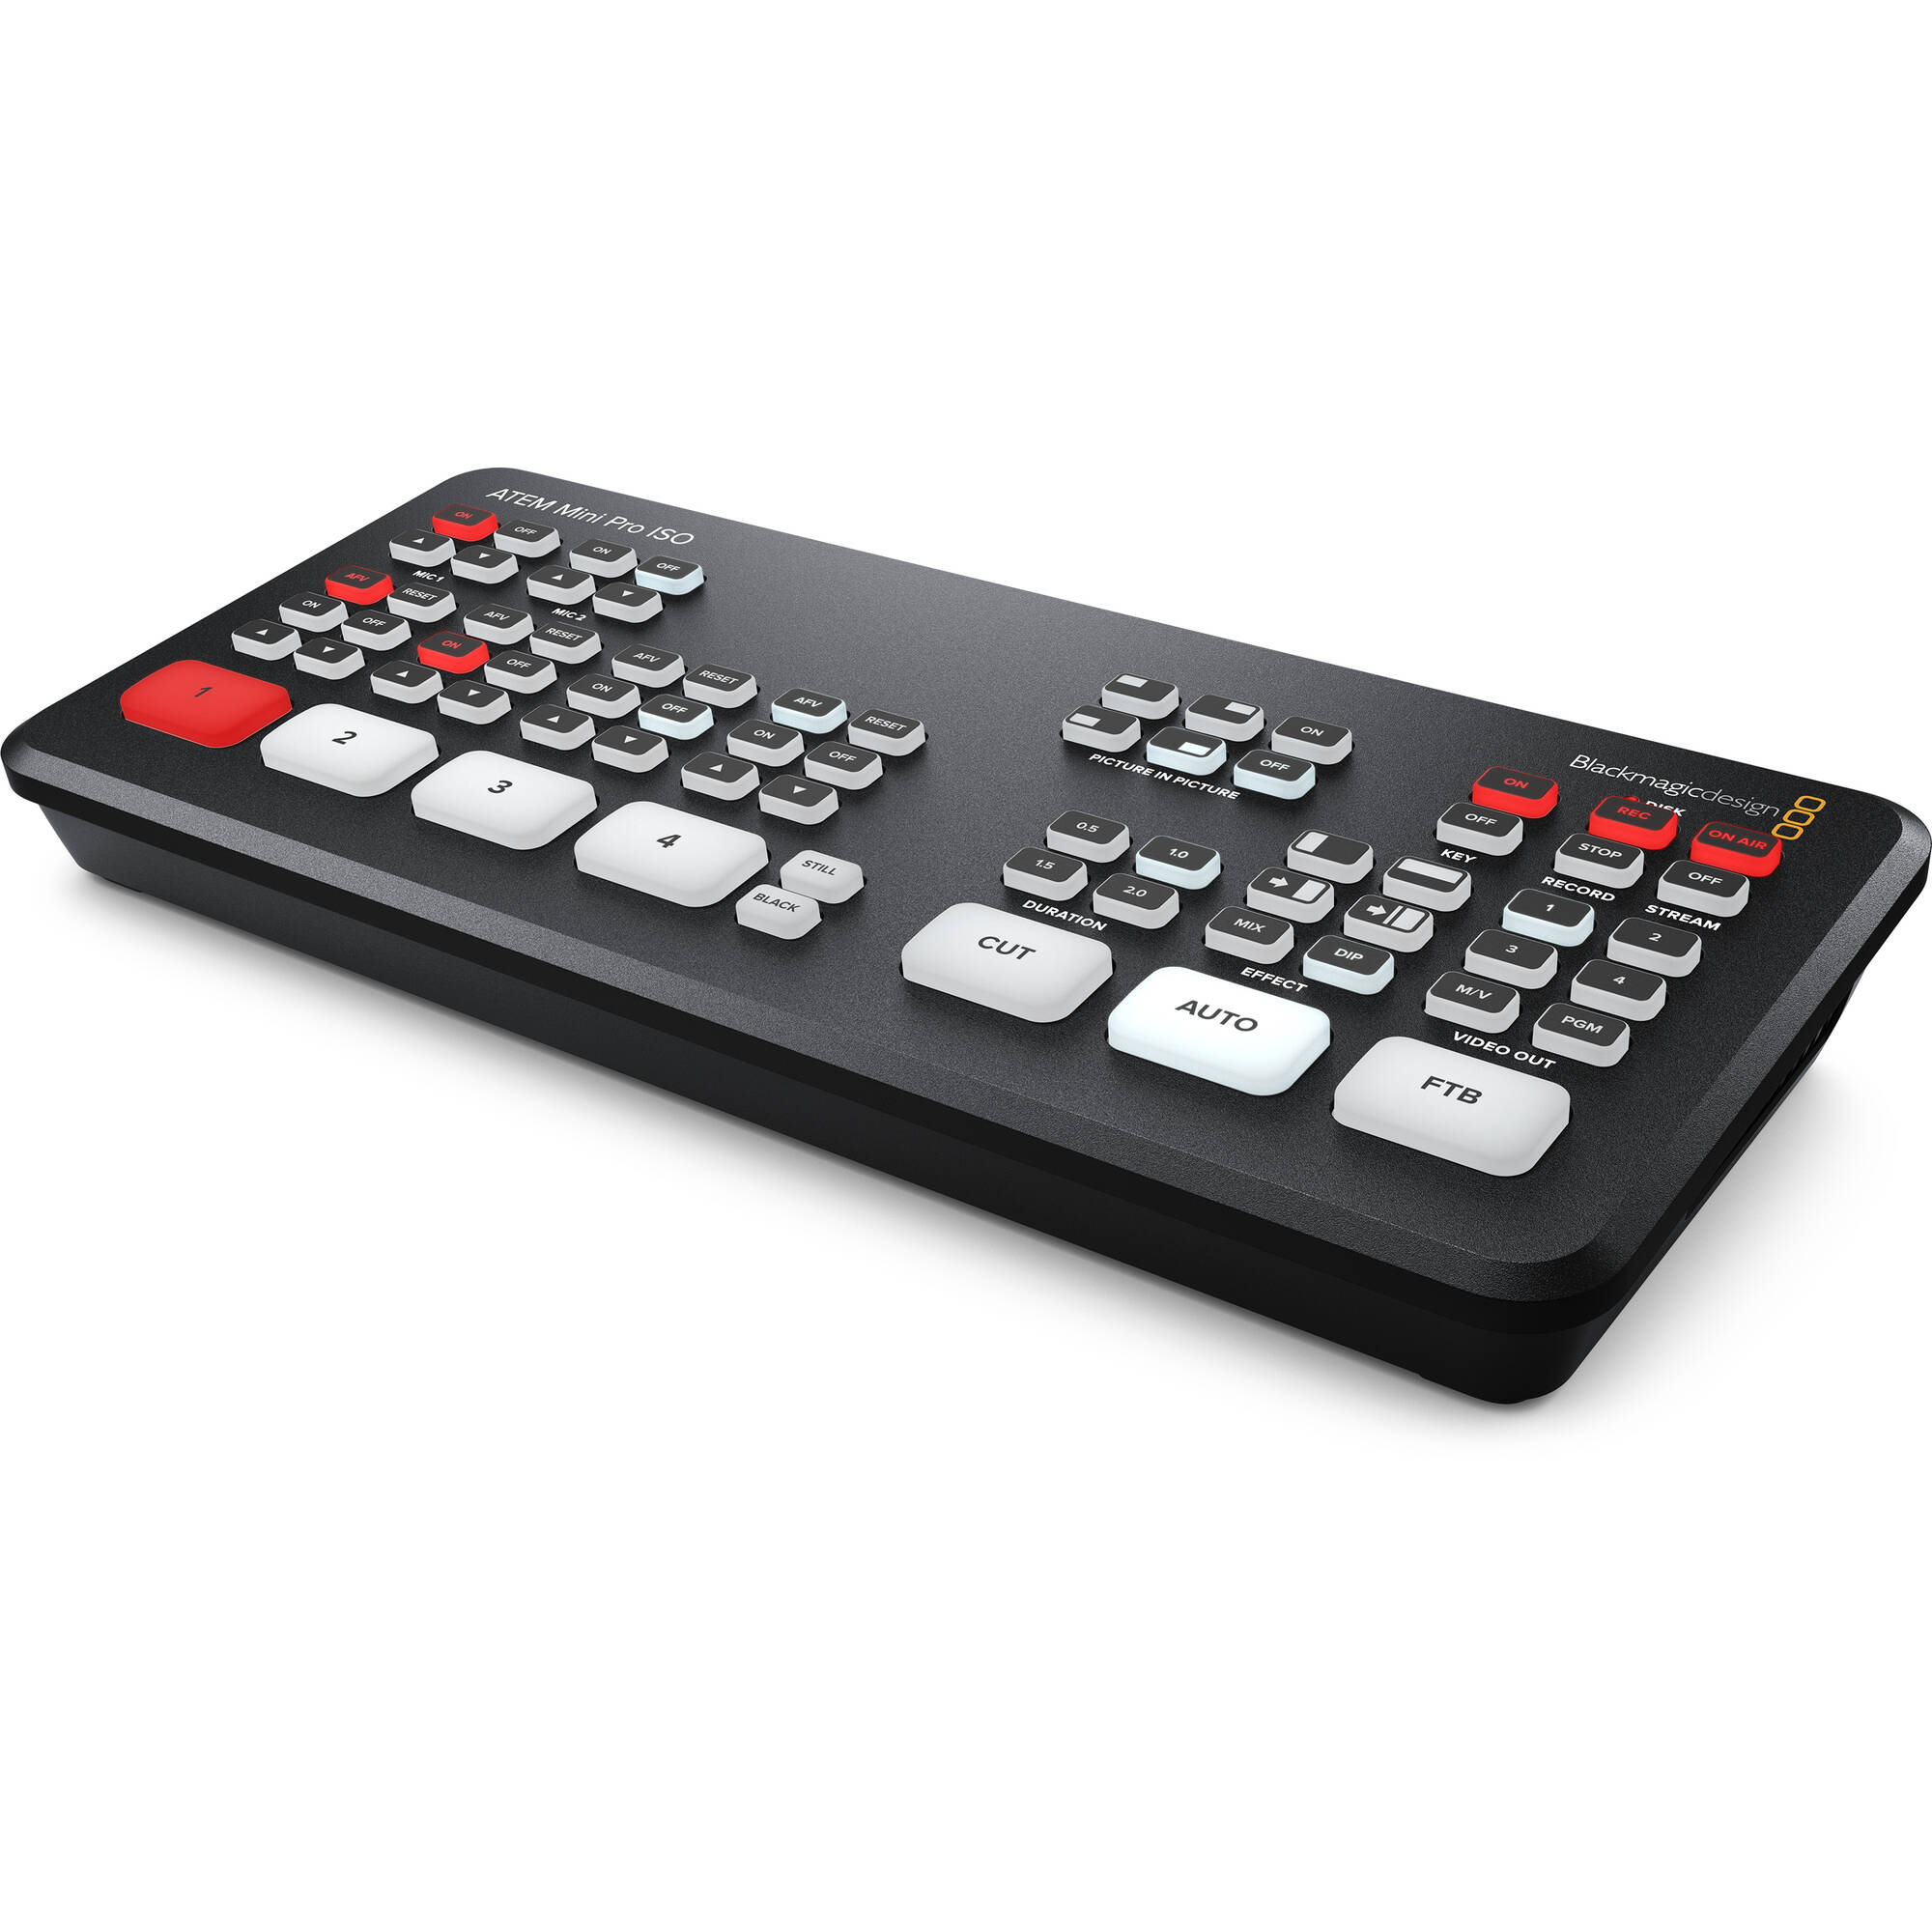

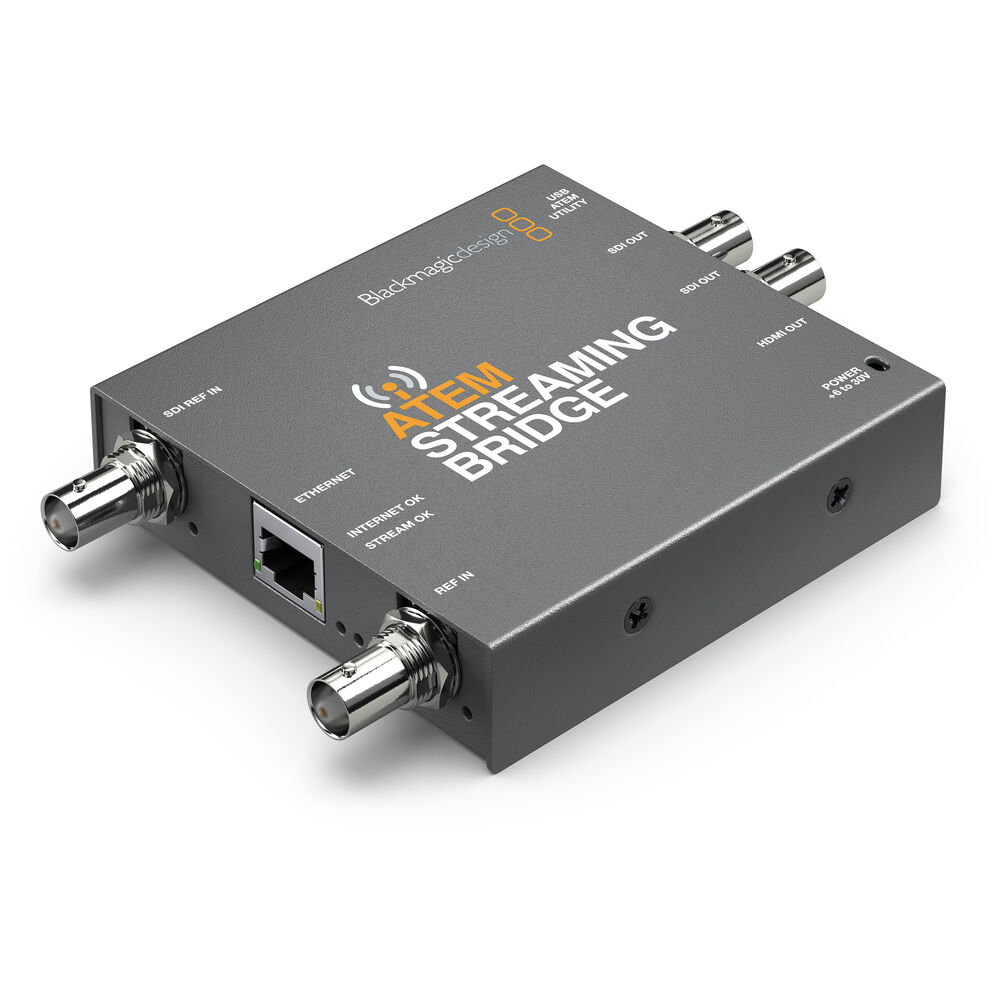
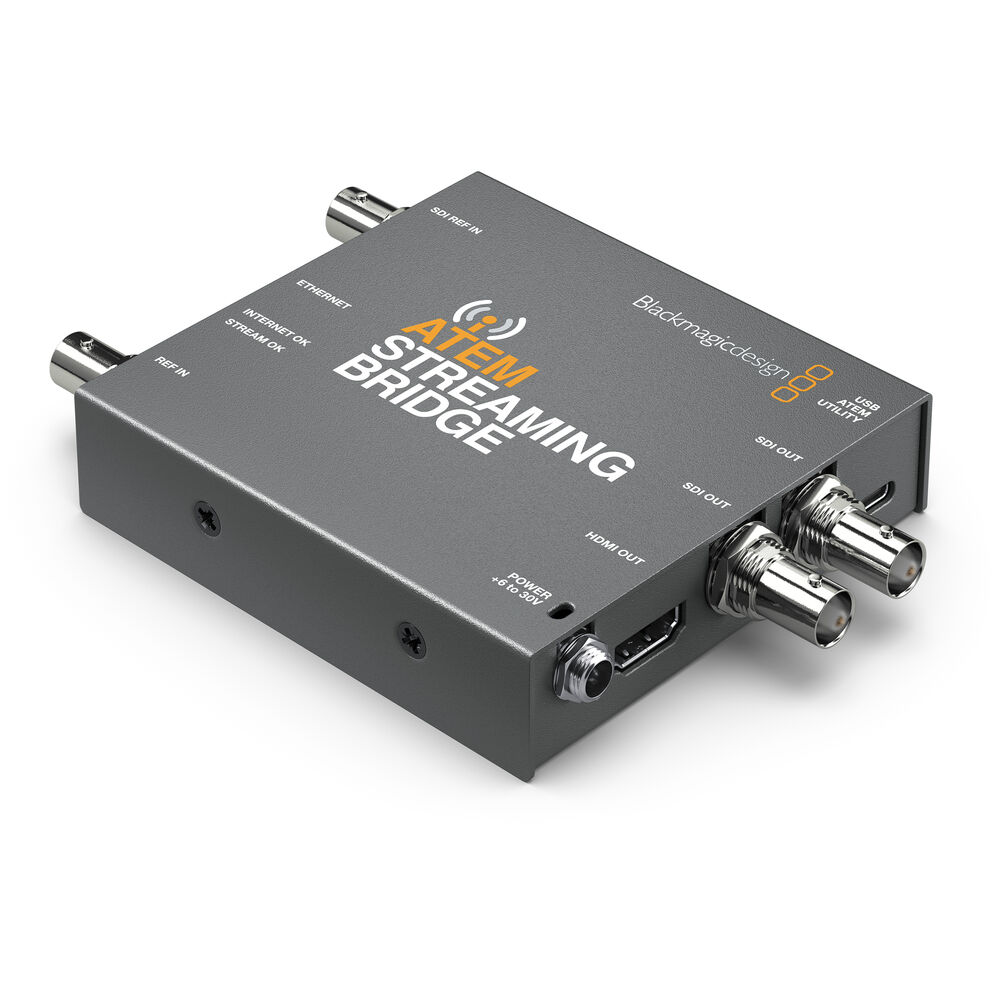
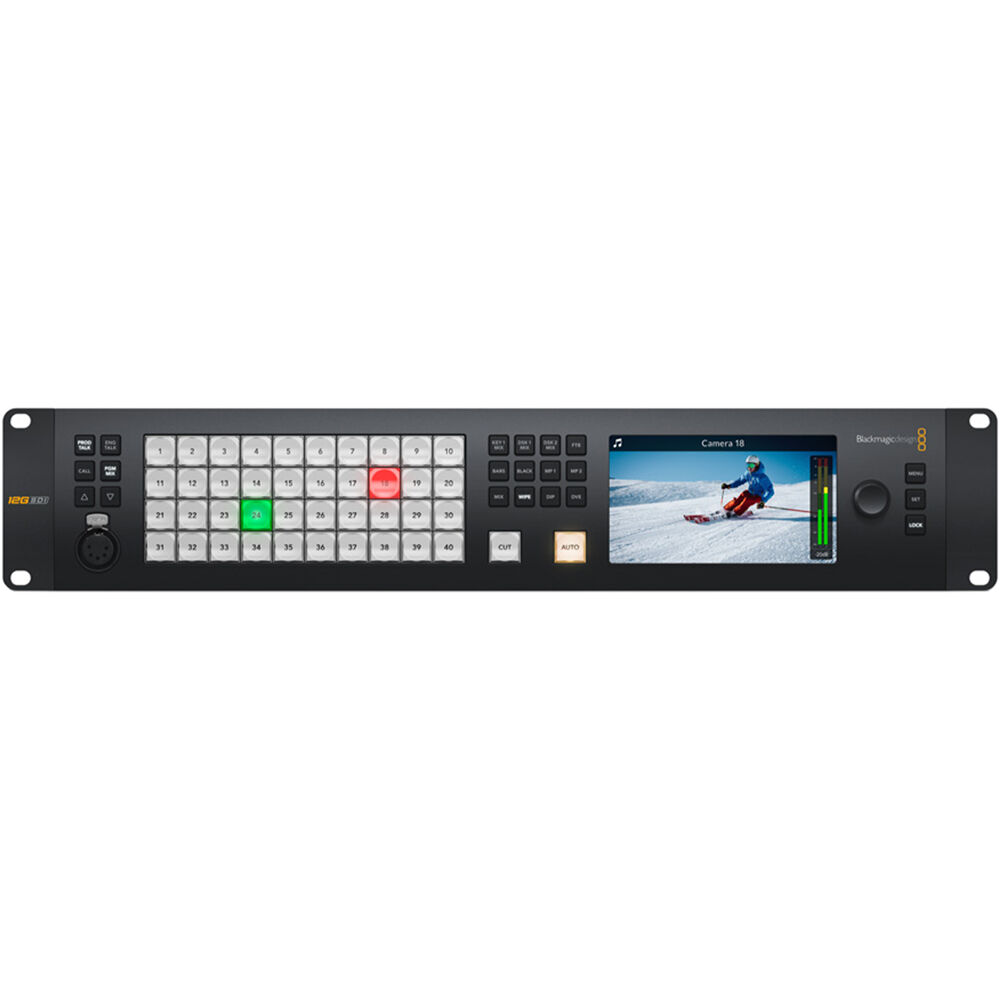
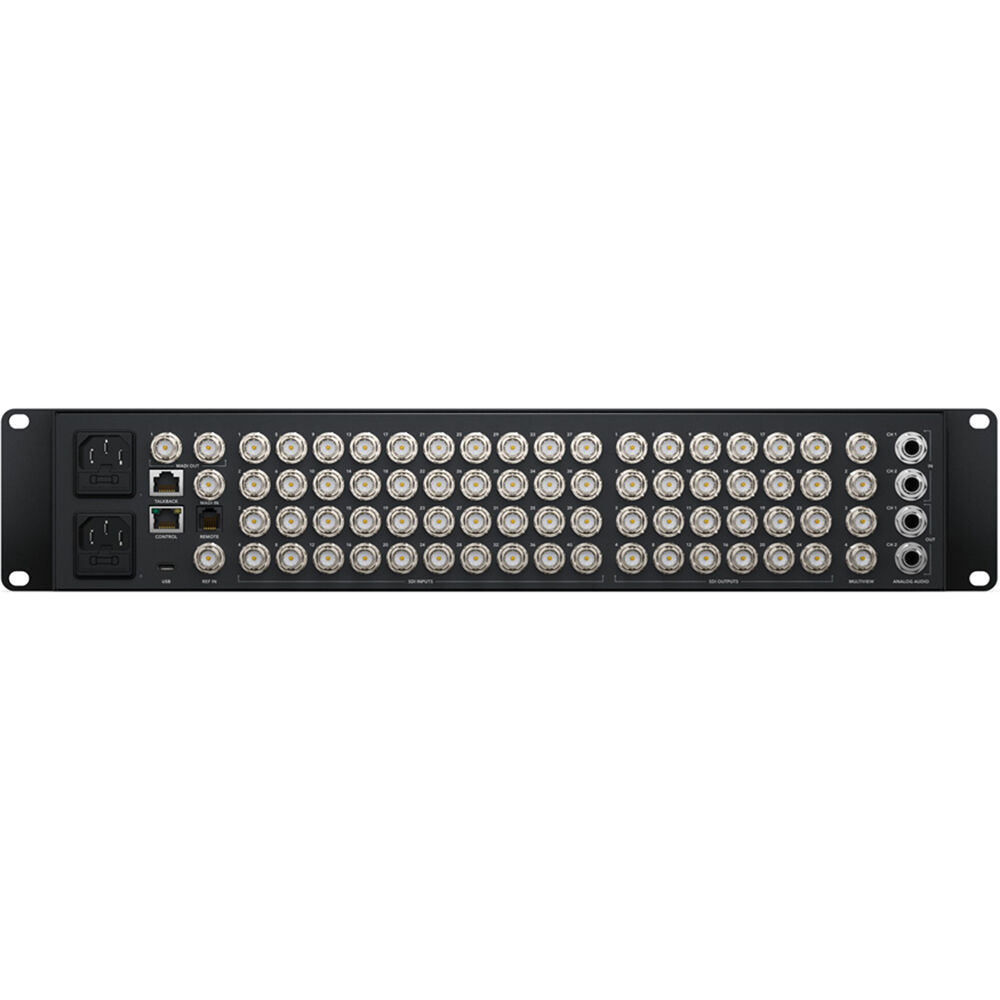
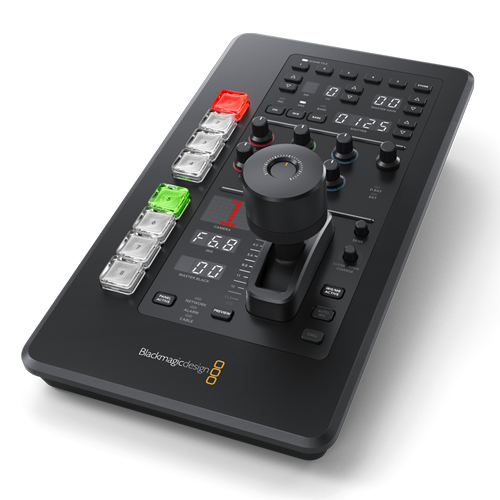
Reviews
There are no reviews yet.